If you’ve dipped your toes into Path of Exile 2’s 0.4 update (The Last of the Druids) and opted for the Fate of the Vaal League, you’ve probably heard the buzz around the Vaal Temple (also known as Vaal Ruins). It’s not just another side activity—this modular dungeon-building mechanic is a goldmine for fast PoE 2 currency, powerful items, and some of the most satisfying progression in the game. But let’s be real: it can feel overwhelming at first. Between figuring out how to unlock Vaal Temple rooms, keeping your layout from falling apart, and actually making it profitable, there’s a lot to wrap your head around. That’s why I’m breaking it all down—no jargon, no overcomplicated steps, just straight-up useful info that works for regular players, not just streamers with 1000 hours in the league.
First Things First: When Do You Unlock PoE 2 Vaal Temple & Why Bother?
Before diving into complex builds and farming methods, let’s answer the two most basic questions new players ask:
-
When can I start using the Vaal Temple? You can access it by selecting the Fate of the Vaal League when creating a character. Early on, you’ll begin encountering Vaal Beacons in regular overworld areas—dark red flickering circles surrounded by denser enemy swarms. Clearing 6 of these beacons unlocks your first access to the Vaal Ruins. After each temple run, you’ll need to clear another 6 beacons to regain entry.
-
Why is the Vaal Temple worth my time? It’s absurdly profitable. Regular players pull 2+ divines per run, farm rare corrupted gear (like +1 corrupted gem body armors), and even score mirrors with the right setup. Plus, it’s addictive—once you get a solid chain going, you’ll skip maps just to jump back in. And you don’t need a maxed build: basic setups can hit 5+ divines per run in under 10 hours. Additionally, it offers unique mechanics like body part modifications and high-risk item corruption that you won’t find elsewhere.
Foundational Step: Mastering Vaal Beacons & Crystal Capacity
You can’t build a profitable temple without understanding the core entry loop and capacity system. Both revolve around Vaal Beacons and the charges they provide.
What Are Vaal Beacons & How Do They Work?
Vaal Beacons are the key to accessing the temple: you’ll find them scattered across overworld zones (at least one per major area). To charge a beacon, step on its circular area and slay the corrupted minions that spawn. Each fully charged beacon contributes to your progress—you need 6 charged beacons to unlock 1 temple run. Importantly, you can stack up to 12 charges max, so make sure to run your temple before over-capping to avoid wasting progress!
Once you’ve collected 6 charges, a portal opens to the Vaal Ruins. Inside, you’ll find a safe starting area with access to your stash, a waypoint, and the critical Temple Console—your tool for building and modifying the dungeon.
Must-Have Medallions (Priority List)
Medallions are key items for accelerating temple construction, dropped by Rare or Unique "boss" monsters in rooms. They act as extra Room Cards usable at the Temple Console—some are standard room cards, while others have powerful special effects. You can use medallions either before or after running the temple, letting you apply valuable effects before decay sets in. Your default medallion storage is 3, which can be upgraded to a maximum of 6. Below are the most critical medallions to prioritize (use this table to keep track):
|
Medallion |
Effect & Key Notes |
Priority (1=Highest) |
|
Zantipi’s Medallion |
Prevents a room from decaying/destroyed (most important for protecting core room chains, avoiding wasted efforts). Also adds a random Waystone modifier (boosts danger & rewards); up to 8 stackable. Every 10 runs with active modifiers, 1 is removed at random. Use only when your character is powerful enough to handle increased dangers. |
1 |
|
Quipolatl’s Medallion |
Upgrades any room’s tier (bypasses adjacent room requirements). Ideal for permanently protected rooms at the start of long chains to steadily boost their benefits. |
2 |
|
Uromoti’s Medallion |
Randomly adds a room. Since the net number of rooms added to the temple each round is small, this significantly speeds up construction progress. |
3 |
|
Upgrade Medallion (Storage) |
Permanent upgrade: +1 medallion storage (max 6). Rare drop from room bosses, common drop from the Architect. |
4 |
|
Upgrade Medallion (Crystal Capacity) |
Permanent upgrade: +6 maximum temple crystal capacity (max 60). Rare drop from room bosses, common drop from the Architect. |
5 |
How to Unlock Them Fast: Architect Rushes
Do 3-5 quick “Architect rushes” early on—no fancy building needed:
-
Build a straight path from the starting room to the Architect’s spawn (use Hall/Path rooms for traversal).
-
Kill the Architect every run (no need to loot extra rooms—focus on unlocking medallions).
-
Repeat until you have 3+ Destabilization Locks and 20+ crystal capacity.
This upfront work saves tons of frustration later—don’t skip it! The Architect is also required to unlock Sealed Vaults, which hold valuable rewards.
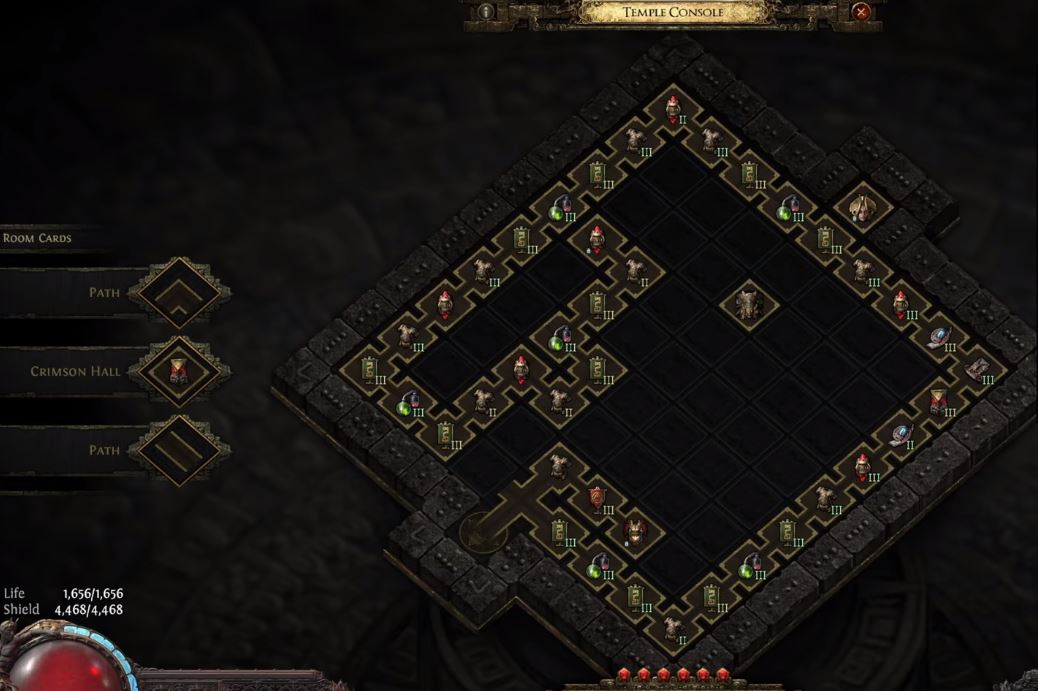
Temple Core Mechanics: 9×9 Grid, Layout & Decay
Before diving into farming methods, you need to understand the temple’s core structure and decay system—these are the biggest sources of frustration for new players:
-
9×9 Grid Layout: The temple is built on a massive 9×9 grid (81 total tiles). Your goal is to bridge the entrance to the Architect’s Chamber, then to Atziri’s Chamber (the final boss).
-
Room/Path Placement: Each run gives you 6 random structures (Hall/Path rooms for traversal or named rooms for loot/mechanics). Paths only need to lead into rooms—you don’t have to connect two doorways to make a path viable. Avoid dead ends where possible to keep navigation smooth.
-
Destruction & Decay: After each run, 2 random structures are destroyed. Defeating the Architect or Atziri destroys one-third of all structures (remaining ones persist for the next run). Certain special rooms trigger “instability,” causing random local destruction. Use Destabilization Locks to protect core rooms, and place “fodder rooms” (random, low-value rooms) off the main chain to absorb decay instead of your critical rooms.
-
Room Synergies: When placing a room, if its outline glows green, it means it will upgrade an adjacent room. Always check room descriptions to see synergy effects—this is how you unlock Tier 3 (max power) rooms.
Top 3 PoE 2 Vaal Temple Farming Methods
Now for the fun part: choosing a farming method. Each caters to different goals—quick profits, steady progression, or big rewards. Let’s break down each with step-by-step instructions.
Method 1: Atziri Rush (Quick, Consistent Profits)
Best for new players or anyone wanting fast, reliable loot. Goal: Kill Atziri (drops 2+ divines per kill, +1 corrupted gem armor, exclusive Vaal items). Fight her every 2-5 runs with this setup.
Question: How do I guarantee access to Atziri?
Follow these steps:
-
Path straight to the Architect: Build a single line of Hall/Path rooms from the start to the Architect’s spawn. Add a cross (2 paths up/down) 2 blocks from the end (paths only, no rooms) to leave space for the Royal Chamber.
-
Kill the Architect: He drops a key for the Royal Chamber (which unlocks Atziri).
-
Place the Royal Chamber: Put it in one of the cross paths after each Architect kill. This keeps it close to the entrance, reducing the risk of decay blocking access.
-
Repeat: Next run, path to the Royal Chamber (it stays in place if the cross is intact) and kill Atziri. Note: In Act 4, time changes will compromise your layout—always check the Temple Console before running to Atziri.
Pro tip: Keep the path simple—no extra rooms means less decay to worry about. Use the waypoint in the starting area to quickly return if you need to restock.
Method 2: Cheap Loop (Steady Progression, Low Risk)
Great for players who want to build gradually. Focus on a simple, maintainable chain of common rooms—5-10 divines per run once scaled.
Question: What’s the core of the Cheap Loop, and why does it work?
Core rooms: Spy Master → Garrison → Armory → Alchemy Lab. They link perfectly, give amazing modifiers (monster quantity/rarity), and are common. Here’s how to build:
-
Start a straight chain: Ideal order: Barracks → Spy Master → Barracks → Armory → Alchemy Lab → Armory → repeat. The Alchemy Lab synergizes with Armory to boost it to Tier 3 (max power, better loot).
-
Add fodder rooms: Build random, low-value rooms/paths off the main chain—these get deleted by decay instead of your core loop (2-4 rooms decay per run).
-
Use locks: Place Destabilization Locks on the last room of the chain to prevent decay. 3-4 Spy Masters in the chain will provide infinite lock sustain via their drops.
Big no-nos: Don’t make loops (one break deletes everything) or link Garrison to Commander (breaks Spy Master spawns). Leave 1 empty tile between chains to prevent accidental connections.
Method 3: Expensive Loop (High Risk, High Reward)
Endgame method for 20-40 divines per run + 40+ exalts from Tier 3 Thaumaturge (corrected from Tamaturge) and Corruption Chambers. Only attempt after mastering the Cheap Loop.
Question: What rare rooms do I need, and how can I protect them?
Core rare rooms: Sacrificial Chamber → Corruption Chamber → Thaumaturge’s Laboratory → Alchemy Lab. Here’s the setup:
-
Collect rare medallions: Save Sacrificial Chamber, Corruption Chamber, and Thaumaturge’s Laboratory medallions (use Room Storage to keep them safe between runs).
-
Build the expensive chain: Alchemy Lab → Thaumaturge’s Laboratory → Corruption Chamber → Sacrificial Chamber. The Thaumaturge’s Laboratory synergizes with adjacent rooms to boost them to Tier 3.
-
Link to Cheap Loop: Connect the expensive chain to your existing Cheap Loop via an Armory. This lets you use your existing locks/fodder to protect the high-value rooms.
-
Sacrifice for upgrades: Sacrifice the Sacrificial Chamber (must be at the chain end) to further boost the Thaumaturge’s Laboratory and Corruption Chamber.
Risk: Lose a rare room, and it could take weeks to replace. Stockpile Destabilization Locks and fodder rooms to mitigate this!
PoE 2 Vaal Temple Building: Layout Rules to Avoid Disaster
These rules come from players who lost entire chains—follow them to save frustration:
-
Stick to straight chains or tree-chains: Single-chain strategy (one line of high-tier rooms) is low risk but low reward density. Tree-chain (central trunk with synergy branches) is meta for maximizing Tier 3 rooms if you can manage instability.
-
Leave 1 empty tile between chains: Prevents accidental connections that can break your layout during decay.
-
Use the Temple Planner: Free online tool (link in notes) to test layouts before building—saves rare medallions and avoids costly mistakes.
-
Reset when needed: Open/close the temple immediately to delete random rooms if your layout is broken (this is called “ripping” the map).
-
Prioritize the Sealed Vault: Place it as close to the entrance as possible. Destruction logic rarely blocks access to early rooms, so this ensures you keep their valuable rewards even if upper-level rooms collapse.
-
Check your map often: Named rooms are marked with red arrows—use them to navigate efficiently. Cleared rooms can be re-entered for breathing room during tough fights.
How to Level Up Spymasters
Assassinate extra Spymasters to level up your core ones:
-
Place an extra Spymaster at a chain end (no rooms after it).
-
Run the temple and kill it—levels up other Spymasters.
-
Don’t lock the extra Spymaster before the run (blocks assassination); lock after if saving
Vaal Temple Room Linking & Synergy Cheat Sheet
Confused about which rooms connect and synergize? Use this table—these are the links you’ll use 90% of the time. Note: Room availability expands with acts (Acts 1-3 have basic rooms; Act 4 unlocks endgame rooms like Corruption Chamber):
|
Room |
Links To |
Key Notes (Synergies/Effects) |
|
Spy Master |
Garrison, Barracks |
Turns Garrison into Legion Barracks (better mods); drops rare locks |
|
Garrison |
Spy Master, Commander, Armory, Synth Flesh Lab |
Avoid Commander in main chain (disrupts Spy Master spawns) |
|
Armory |
Garrison, Smithy, Alchemy Lab |
Needs Alchemy Lab for Tier 3; contains weapon caches (unlock via first weapon rack) |
|
Alchemy Lab |
Armory, Smithy, Thaumaturge’s Laboratory |
Upgrades nearby rooms; Tier 3 rewards Corrupted Soul Cores (defeat Vaal constructs) |
|
Thaumaturge’s Laboratory (corrected from Tamaturge) |
Alchemy Lab, Corruption Chamber, Sacrificial Chamber |
Boosts adjacent rooms to Tier 3; cuts/improves gems (better options at higher tiers) |
|
Corruption Chamber |
Thaumaturge’s Laboratory, Sacrificial Chamber, Generator |
Tier 3 lets you re-corrupt already corrupted items (50% destroy chance, 50% Vaal blessing); Act 4 exclusive |
|
Generator |
Corruption Chamber, Sacrificial Chamber |
Boosts Corruption/Sacrificial Chambers nearby; filled with Construct Monsters |
|
Surgeon’s Ward (Act 4) |
Prosthetic Research |
Replace body parts with Vaal-grown versions (temporary bonuses, lost on death); needs Prosthetic Research synergy |
Pro tip: Test connections with Hall/Path rooms first—cheaper than wasting rare named rooms!
Key PoE 2 0.4 League Mechanics: Time-Travel & Corruption
The Fate of the Vaal League adds two game-changing mechanics that tie into the temple:
Time-Travel
The temple entrance has a prototype time portal device that lets you travel back to the moment just before Atziri destroyed the Vaal. Your goal here is to stop her, but you’ll first need to visit the Architect—access him by exploiting Vaal technology in the past. This time-travel mechanic is required to unlock Atziri’s final chamber and access Act 4’s unique temple content.
Corruption (New Rules)
This league overhauls item corruption with high-risk, high-reward options:
-
Tier 3 Corruption Chamber: Unlocks re-corruption of already corrupted items (50% chance to destroy, 50% chance for a powerful Vaal blessing)—this is the league’s signature risk/reward loop.
-
Corrupted Vaal Tablets: Corrupt your Vaal Tablets to create new tile effects—makes mapping more dangerous but rewards better loot.
-
New Vaal Crafting: Crafting outcomes tied to Soul Cores, Vaal-only modifiers, new currency types, corrupted item interactions, and Surgeon’s Ward body modifications. Corruption is now calculated: understand room synergies, plan your path, and decide if the risk is worth the reward.
PoE 2 Best Temple Build Recommendations
You don’t need a god-tier build, but you do need to handle 15-25M HP enemies. Here are two solid options:
Budget Build: Fire Trap Elementalist (Under 1 Divine)
-
Pros: Cheap, great defense, clears packs fast with area damage.
-
Gear Priorities: Fire damage, spell damage, life, resistances (no uniques needed).
-
Why it works: Elementalist’s penetration melts temple monsters; Fire Trap is easy to level with and handles dense packs common in Garrison/Barracks rooms.
Endgame Build: Arc Comet Blood Mage
-
Pros: Massive defense (block + spell suppression), absurd damage for Expensive Loop runs.
-
Gear Priorities: Fire damage, crit chance, defense mods (upgrade as you farm; prioritize spell suppression for Corruption Chamber’s high-damage foes).
-
Why it works: Ignores enemy resistances—perfect for the temple’s varied mobs (Constructs, corrupted Vaal warriors, etc.).
Final Pro Tips to Print PoE 2 Currency
-
Run all unique named rooms: Don’t skip Thaumaturge’s Laboratory (gem upgrades) or Sealed Vaults (valuable loot)—they’re worth the extra time.
-
Embrace decay: Fodder rooms are meant to be lost—focus on protecting your core chain with Destabilization Locks.
-
Manage medallion space: Delete common medallions to make room for Destabilization Locks and Spy Masters—they’re the most critical for long-term profitability.
-
Don’t stress mistakes: Resetting (ripping) the map is easy, and you’ll be profitable again quickly. Use the Temple Console to archive progress after each run to avoid losing layout progress.
-
Prep before running: Access your stash in the temple’s starting area to equip the best gear for the run. If you die, you’ll lose Surgeon’s Ward body modifications and have to revisit the ward to rebuild them.
The Vaal Temple is one of PoE 2’s best mechanics—accessible to everyone, from casuals to hardcore players. With these methods and tips, you’ll turn your temple into a currency machine in no time. Grab your beacons, start building, and enjoy the loot! See you in the ruins.